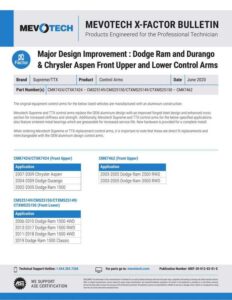
Important Installation Instructions
To ensure proper part performance and prevent premature failure, correct installation orientation of the directional type ball joint is crucial. The identified part numbers (MS10535) are designed to allow for an increased swing angle in a particular direction.
Pre-Installation Checks
Clear all mating surfaces of rust, debris, and burrs. Inspect the control arm mounting flange for cracks, deformation, and out-of-round condition. Replace the control arm body if any of these conditions are found.
Installation Procedure
Press-in the ball joint in the correct orientation. Verify the press-in diameters and stud tolerances. Replace all damaged or out-of-specification mating components. Ensure pressure is applied to the mounting flange and not the ball joint back plate.
Verification Process
Locate the ball joint index mark and control arm index mark during installation. Align the marks and ensure the circlip holes are oriented 90° from the index marks. Refer to the factory service manual for correct diagnostic procedures, component removal and installation methods, and fastening torque values and procedures.
Only use a calibrated torque wrench for final fastening, and ensure to refer to the original manufacturer’s service manual for proper torque specifications and installation procedures.
Manual:
Chat: Powered By VoiceSphere